Introduction
Learning API automation testing can be challenging when you don't have reliable test APIs to practice with. Public APIs often have rate limits, authentication requirements, or may change without notice. What if you could have a complete API testing environment running on your own computer, with multiple API types ready to use?
Meet PlayPI - a free, open-source API playground that runs entirely on your local machine. No internet required, no API keys needed, and no rate limits!
About PlayPI: PlayPI was originally developed by Abhijeet Vaikar, a passionate QA engineer and test automation enthusiast. The project is open-source and available on GitHub.
What is PlayPI?
PlayPI (pronounced Play-P-I, like API) is a Docker-based tool that gives you instant access to 6 different API services covering the most popular protocols:
- RESTful APIs (2 services) - HTTP-based APIs for inventory and task management
- GraphQL API - Query-based API for flexible data fetching
- gRPC APIs (2 services) - High-performance RPC framework
- WebSocket API - Real-time bidirectional communication
All services come with a beautiful web dashboard where you can:
- Start and stop services with one click
- Test API endpoints interactively
- Edit request bodies before sending
- See live responses
Who Should Use PlayPI?
- QA Engineers learning API automation testing
- Developers practicing API integration
- Students studying web services and protocols
- Workshop Instructors teaching API testing
- Anyone wanting to understand how different API types work
What's New in PlayPI?
The latest version of PlayPI introduces a game-changing feature that makes API testing even more accessible: an integrated web dashboard!
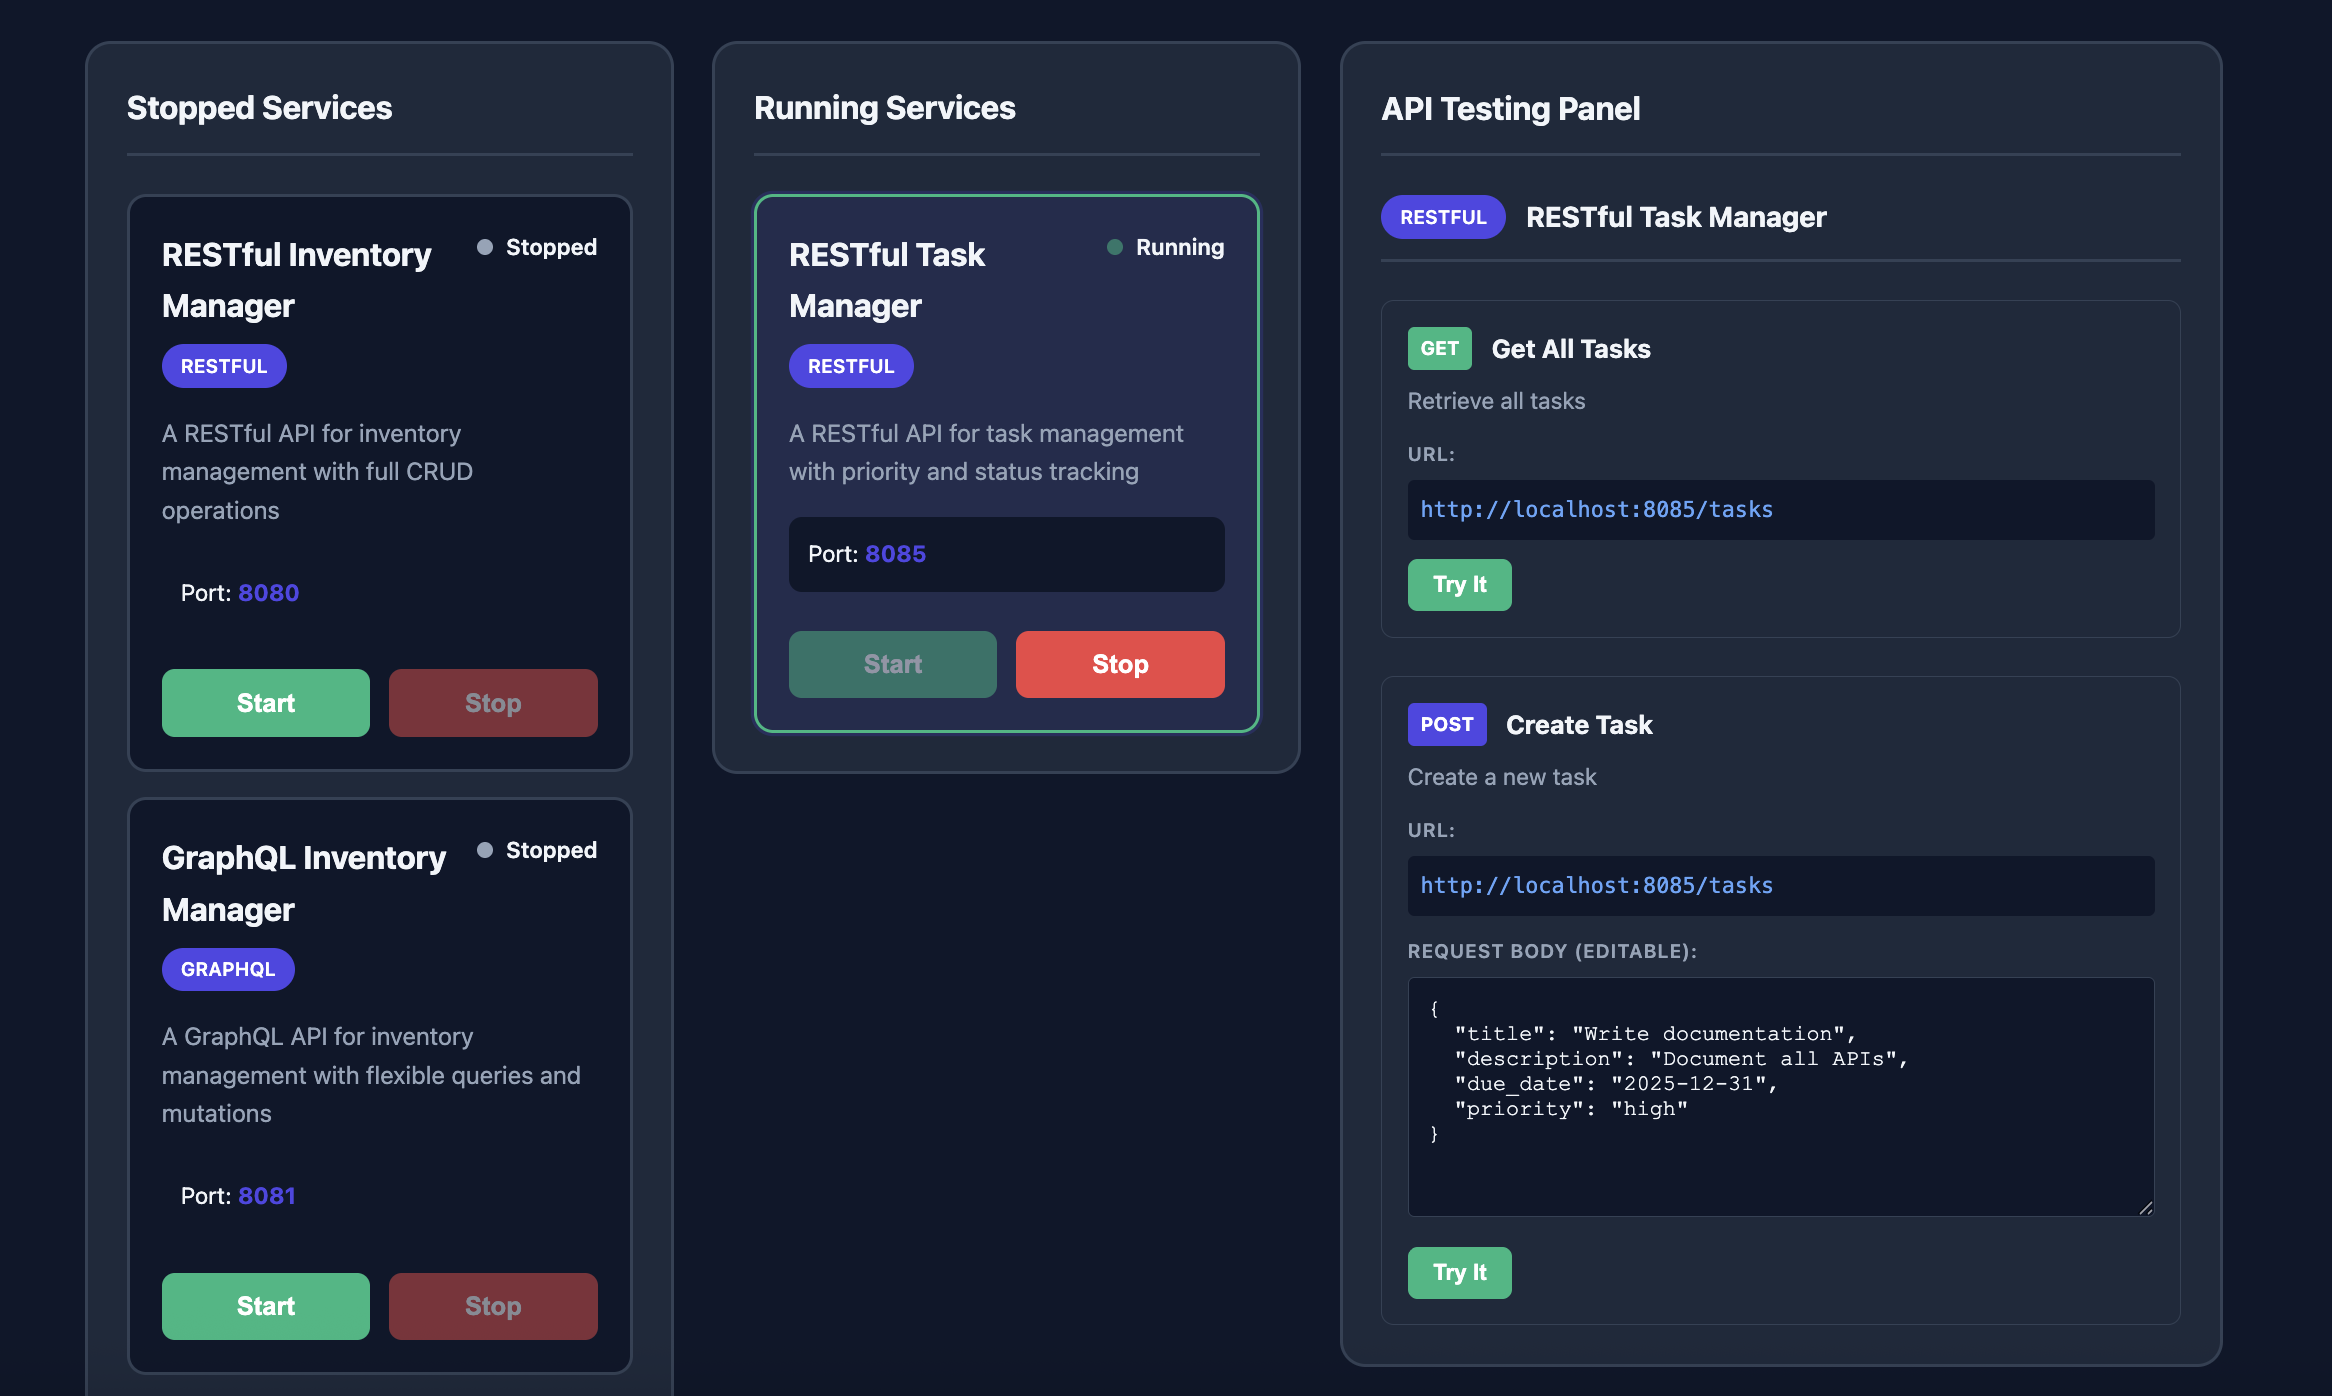
PlayPI Dashboard showing the three-column layout: Stopped Services, Running Services, and API Testing Panel
New Dashboard Features:
- One-Click Service Management - Start and stop any API service with a single button click
- Interactive API Testing Panel - Test endpoints directly from your browser without needing Postman or curl
- Live Request Editor - Edit JSON request bodies in real-time before sending
- Instant Response Viewer - See API responses immediately with syntax highlighting
- Visual Service Status - Track which services are running or stopped at a glance
- No Additional Tools Required - Everything you need is built right into the dashboard
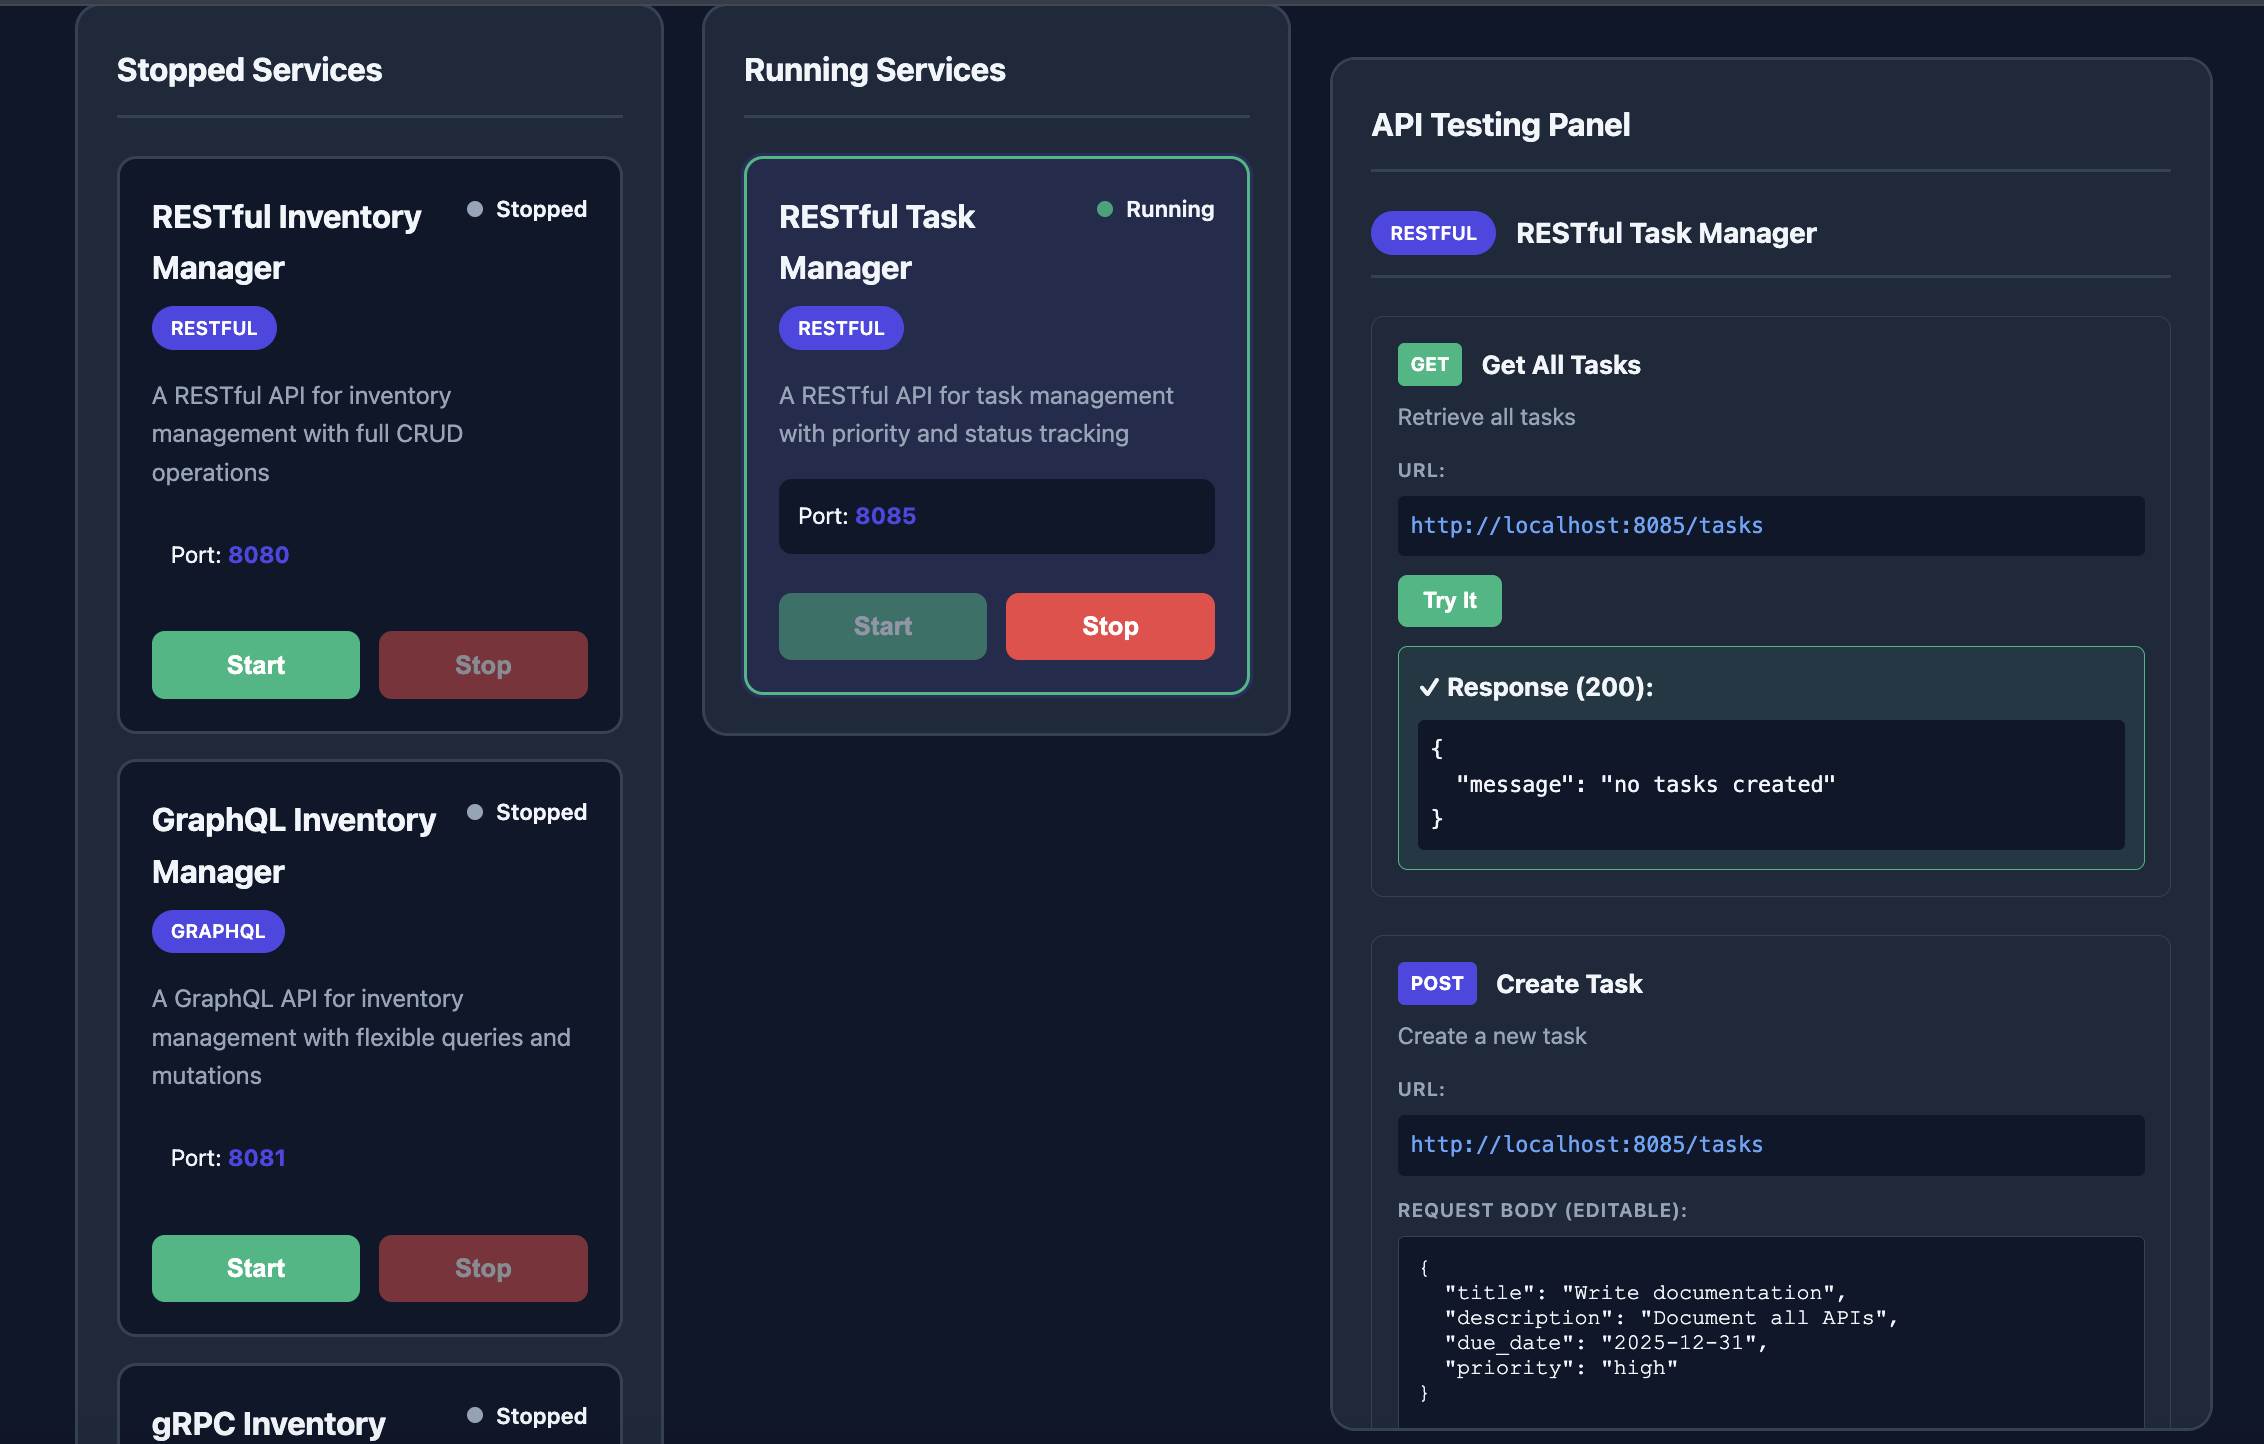
Interactive API Testing Panel with live request editor and instant response viewer
Why the Dashboard Makes a Difference
Previously, testing APIs required knowledge of command-line tools like curl or third-party applications like Postman. While these are valuable tools to learn, they create an additional barrier for beginners who just want to understand how APIs work.
With the integrated dashboard, you can now:
- Start learning immediately - No need to learn curl syntax or install additional software
- Experiment freely - Edit request payloads and see results instantly
- Focus on concepts - Understand API behavior without getting stuck on tooling
- Test all API types - RESTful, GraphQL, gRPC, and WebSocket - all from one interface
- Perfect for teaching - Instructors can demonstrate API testing without complex setup
Edit JSON request bodies in real-time and see API responses with syntax highlighting
Pro Tip: Once you're comfortable with the dashboard, you can graduate to professional tools like Postman, Insomnia, or command-line tools. The dashboard provides the perfect learning environment before moving to production-grade tools!
Prerequisites
Before we begin, you'll need Docker installed on your computer. Don't worry - we'll walk through everything step by step!
Step 1: Install Docker
Docker is a platform that lets you run applications in containers. Think of it as a lightweight virtual machine.
For Windows:
- Go to Docker Desktop for Windows
- Download Docker Desktop
- Run the installer
- Follow the installation wizard
- Restart your computer when prompted
- Open Docker Desktop to complete setup
System Requirements:
- Windows 10 64-bit: Pro, Enterprise, or Education
- OR Windows 11 64-bit: Home or Pro
- WSL 2 feature enabled (installer will help with this)
For macOS:
- Go to Docker Desktop for Mac
- Download the version for your chip:
- Apple Silicon (M1/M2/M3): Download "Mac with Apple chip"
- Intel Mac: Download "Mac with Intel chip"
- Open the downloaded
.dmgfile - Drag Docker to Applications folder
- Open Docker from Applications
- Grant necessary permissions when prompted
For Linux:
Ubuntu/Debian:
# Update package index
sudo apt-get update

# Install Docker
sudo apt-get install docker.io

# Start Docker service
sudo systemctl start docker
sudo systemctl enable docker

# Add your user to docker group (so you don't need sudo)
sudo usermod -aG docker $USER

# Log out and log back in for changes to take effect
For other Linux distributions, check the official Docker docs.
Step 2: Verify Docker Installation
Open your terminal (Command Prompt on Windows, Terminal on Mac/Linux) and run:
docker --versionYou should see output like:
Docker version 24.0.7, build afdd53bIf you see this, congratulations! Docker is installed correctly.
Getting Started with PlayPI
Now comes the exciting part - running PlayPI!
Step 1: Pull the PlayPI Image
Open your terminal and run:
docker pull taqelah/playpi:latestThis downloads the PlayPI dashboard from Docker Hub. It's about 50MB and includes everything you need.
You'll see output like:
latest: Pulling from taqelah/playpi
a1b2c3d4e5f6: Pull complete
...
Status: Downloaded newer image for taqelah/playpi:latest
Step 2: Start the Dashboard
Run this command to start PlayPI:
docker run -p 8000:8000 -p 8080:8080 -p 8081:8081 -p 8082:8082 -p 8084:8084 -p 8085:8085 -p 8086:8086 taqelah/playpi:latestWhat do these port numbers mean?
-p 8000:8000- Maps your computer's port 8000 to the container's port 8000 (dashboard)-p 8080:8080- RESTful Inventory API-p 8081:8081- GraphQL API-p 8082:8082- gRPC Inventory API-p 8084:8084- gRPC User Registration API-p 8085:8085- RESTful Task Management API-p 8086:8086- WebSocket Chat API
You'll see output like:
Starting PlayPI Dashboard...
Preparing dashboard...
Checking and freeing dashboard ports...
✓ All dashboard ports are available

✓ Dashboard running on http://localhost:8000
Open your browser to manage all services
Step 3: Open the Dashboard
Open your web browser and go to:
http://localhost:8000You should see the PlayPI dashboard with three columns:
- Left Column: Stopped Services
- Middle Column: Running Services
- Right Column: API Testing Panel
Using PlayPI for API Testing
Let's walk through testing different types of APIs!
Testing a RESTful API
RESTful APIs are the most common type. Let's test the Inventory Management API.
Step 1: Start the Service
- In the left column, find "RESTful Inventory Manager"
- Click the green Start button
- Wait for the service to move to the middle "Running Services" column
Step 2: Select the Service
- Click on "RESTful Inventory Manager" in the middle column
- The right panel will show available API endpoints
Step 3: Test GET Request
- Find the "Get All Items" example
- You'll see:
- Method: GET (green badge)
- URL:
http://localhost:8080/items - Description: Retrieve all inventory items
- Click the Try It button
- See the response appear below:
{
"items": [
{
"id": 1,
"name": "Laptop",
"description": "Dell XPS 15",
"price": 1299.99,
"quantity": 5
},
{
"id": 2,
"name": "Mouse",
"description": "Wireless Mouse",
"price": 29.99,
"quantity": 50
}
]
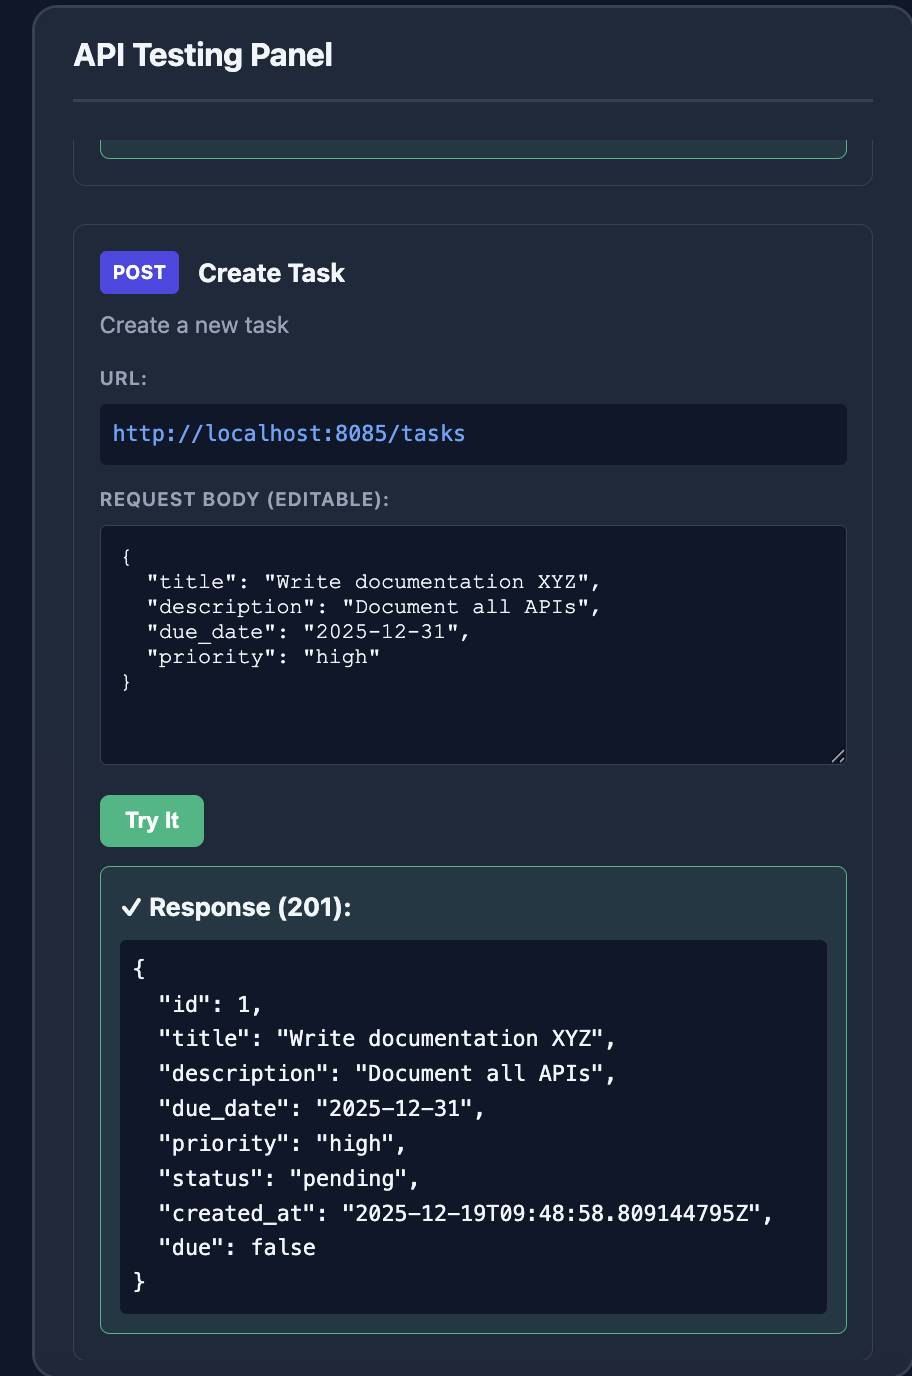
}Step 4: Test POST Request (With Editable Body!)
- Find the "Create Item" example
- You'll see an editable text area with JSON:
{
  "name": "Keyboard",
  "description": "Mechanical Keyboard",
  "price": 89.99,
  "quantity": 15
}- Edit the JSON - Try changing the values:
{
  "name": "Monitor",
  "description": "4K Monitor 27 inch",
  "price": 399.99,
  "quantity": 10
}- Click Try It
- See your custom item created:
{
  "id": 3,
  "name": "Monitor",
  "description": "4K Monitor 27 inch",
  "price": 399.99,
  "quantity": 10
}
Testing a GraphQL API
GraphQL lets you request exactly the data you need.
Step 1: Start GraphQL Service
- Find "GraphQL Inventory Manager" in the stopped column
- Click Start
- Click on it in the running column
Step 2: Test a Query
- Find the "Get All Items" example
- See the GraphQL query:
{
  items {
    id
    name
    price
  }
}- Notice you're only requesting
id,name, andprice- not all fields! - Click Try It
- Get only the data you asked for
Step 3: Test a Mutation
- Find the "Add Item" example
- Edit the mutation to add your own item
- Click Try It
Testing WebSocket (Real-time Communication)
WebSocket APIs enable real-time, two-way communication.
Step 1: Start WebSocket Service
- Find "WebSocket Live Chat"
- Click Start
- Click on it when running
Step 2: View Connection Info
You'll see:
- Method: WS (purple badge)
- URL:
ws://localhost:8086/ws - Description: Connect using WebSocket client
Note: WebSocket requires special client tools like:
- Browser console (
new WebSocket()) - Postman (WebSocket request)
- Command-line tools like
wscat
Example using browser console:
const ws = new WebSocket('ws://localhost:8086/ws');

ws.onopen = () => {
    console.log('Connected!');
    ws.send(JSON.stringify({
        type: 'message',
        username: 'TestUser',
        content: 'Hello!'
    }));
};

ws.onmessage = (event) => {
    console.log('Received:', event.data);
};
Testing gRPC APIs
gRPC is a high-performance RPC framework.
You'll need special tools for gRPC:
- grpcurl (command-line tool)
- Postman (supports gRPC)
- BloomRPC (GUI client)
Example with grpcurl:
# List available services
grpcurl -plaintext localhost:8082 list

# Call a method
grpcurl -plaintext -d '{"id": 1}' localhost:8082 inventory.InventoryService/GetItem
Real-World API Testing Scenarios
Now that you understand the basics, let's explore practical testing scenarios.
Scenario 1: Testing CRUD Operations
Test the complete Create-Read-Update-Delete cycle:
- Create: POST a new item
- Read: GET the item by ID
- Update: PUT/PATCH to modify it
- Delete: DELETE to remove it
- Verify: GET again to confirm deletion
Scenario 2: Testing Error Handling
- Try to GET a non-existent item (ID: 99999)
- POST with invalid data (negative price)
- DELETE an already deleted item
- See how the API responds to errors
Scenario 3: Performance Testing
- Start the RESTful Task Manager
- Create 100 tasks in a loop
- Measure response times
- Test pagination and filtering
Scenario 4: Integration Testing
Test interactions between services:
- Create an item in RESTful API
- Query it via GraphQL
- Verify data consistency
Using PlayPI for Test Automation
PlayPI is perfect for practicing API automation with tools like:
Postman
- Create a new collection
- Add requests for each endpoint
- Write tests using JavaScript
- Run the collection
Example Postman test:
pm.test("Status code is 200", function () {
    pm.response.to.have.status(200);
});

pm.test("Response has items array", function () {
    pm.expect(pm.response.json()).to.have.property('items');
});
Python + Requests
import requests

# Test GET
response = requests.get('http://localhost:8080/items')
assert response.status_code == 200
assert 'items' in response.json()

# Test POST
new_item = {
    "name": "Tablet",
    "description": "iPad Pro",
    "price": 799.99,
    "quantity": 8
}
response = requests.post('http://localhost:8080/items', json=new_item)
assert response.status_code == 201
assert response.json()['name'] == 'Tablet'
JavaScript + Axios
const axios = require('axios');

async function testAPI() {
    // GET request
    const response = await axios.get('http://localhost:8080/items');
    console.log('Items:', response.data);

    // POST request
    const newItem = {
        name: 'Headphones',
        description: 'Noise Cancelling',
        price: 249.99,
        quantity: 20
    };
    const created = await axios.post('http://localhost:8080/items', newItem);
    console.log('Created:', created.data);
}

testAPI();
REST Assured (Java)
import io.restassured.RestAssured;
import static io.restassured.RestAssured.*;
import static org.hamcrest.Matchers.*;

public class InventoryAPITest {
    @Test
    public void testGetAllItems() {
        given()
            .baseUri("http://localhost:8080")
        .when()
            .get("/items")
        .then()
            .statusCode(200)
            .body("items", notNullValue());
    }
}
Advanced Features
Automatic Port Cleanup
If you see "port already in use" errors, PlayPI automatically cleans up ports on startup!
You'll see:
Preparing dashboard...
Checking and freeing dashboard ports...
Port 8000 is in use, attempting to free it...
✓ Port 8000 freed successfully
✓ All dashboard ports are available
Stopping and Starting Services
- Stop services when not needed to save resources
- Start only the services you're testing
- All data resets when you restart a service (perfect for testing!)
Running in Background (Detached Mode)
To run PlayPI in the background:
docker run -d \
  --name playpi \
  -p 8000:8000 -p 8080:8080 -p 8081:8081 -p 8082:8082 \
  -p 8084:8084 -p 8085:8085 -p 8086:8086 \
  taqelah/playpi:latest
Check if it's running:
docker psView logs:
docker logs playpiStop it:
docker stop playpiStart it again:
docker start playpiRemove it:
docker rm playpiTroubleshooting
"Cannot connect to Docker daemon"
Problem: Docker isn't running
Solution:
- Windows/Mac: Open Docker Desktop
- Linux: Run
sudo systemctl start docker
"Port is already allocated"
Problem: Another application is using the port
Solution:
- Stop other applications using those ports
- Or use PlayPI's automatic cleanup (it does this by default!)
"docker: command not found"
Problem: Docker isn't installed or not in PATH
Solution:
- Reinstall Docker
- Windows: Add Docker to PATH in Environment Variables
- Mac/Linux: Docker should be in PATH automatically
Dashboard doesn't open
Problem: Container might not be running
Solution:
# Check if container is running
docker ps

# Check container logs
docker logs <container-id>

# Restart the container
docker restart <container-id>
"Try It" buttons show errors
Problem: Service might not be started
Solution:
- Make sure the service is in the "Running Services" column
- Wait a few seconds after starting
- Check that all ports are mapped correctly
Best Practices
1. Start Fresh for Each Test Session
# Stop and remove old container
docker stop playpi && docker rm playpi

# Start fresh
docker run -d --name playpi -p 8000-8002:8000-8002 -p 8004-8006:8004-8006 taqelah/playpi:latest
2. Use Descriptive Test Data
When creating items, use realistic data:
{
  "name": "Product-Test-123",
  "description": "Created during test run at 2025-01-15",
  "price": 99.99,
  "quantity": 10
}
3. Test Edge Cases
- Empty strings
- Very long strings
- Negative numbers
- Zero quantities
- Special characters
- Unicode characters
4. Document Your Tests
Keep a log of what you tested:
✅ GET /items - Returns 200
✅ POST /items - Creates new item
✅ GET /items/1 - Returns specific item
❌ DELETE /items/1 - Returns 404 (expected: 200)
Learning Path
Week 1: REST Basics
- Learn HTTP methods (GET, POST, PUT, DELETE)
- Test RESTful Inventory API
- Practice with Postman
Week 2: GraphQL
- Understand queries vs mutations
- Test GraphQL Inventory API
- Learn field selection
Week 3: Advanced REST
- Test Task Management API
- Learn pagination, filtering, sorting
- Test error responses
Week 4: Real-time APIs
- Understand WebSocket protocol
- Test Live Chat API
- Learn bidirectional communication
Week 5: gRPC
- Learn Protocol Buffers
- Test gRPC services
- Compare performance with REST
Week 6: Automation
- Write automated tests
- Use testing frameworks
- Create test suites
Conclusion
PlayPI gives you a complete API testing playground right on your computer. No setup hassles, no API keys, no rate limits - just pure learning and practicing.
Whether you're preparing for a QA interview, building your first automation framework, or teaching a workshop, PlayPI provides realistic APIs to work with.
What's Next?
- Fork the project: GitHub Repository
- Contribute: Add more API examples
- Share: Help others learn API testing
- Connect with the creator: Abhijeet Vaikar on LinkedIn
Quick Reference Card
# Pull image
docker pull taqelah/playpi:latest

# Run dashboard
docker run -p 8000:8000 -p 8080:8080 -p 8081:8081 -p 8082:8082 -p 8084:8084 -p 8085:8085 -p 8086:8086 taqelah/playpi:latest

# Run in background
docker run -d --name playpi -p 8000-8002:8000-8002 -p 8004-8006:8004-8006 taqelah/playpi:latest

# Stop
docker stop playpi

# Start
docker start playpi

# Remove
docker rm playpi

# View logs
docker logs playpi
Dashboard URL: http://localhost:8000
Service Ports:
- 8080 - RESTful Inventory
- 8081 - GraphQL Inventory
- 8082 - gRPC Inventory
- 8084 - gRPC User Registration
- 8085 - RESTful Task Management
- 8086 - WebSocket Chat
Happy Testing!
Found this helpful? Star the project on GitHub and share with your fellow testers!
Want to Learn More About API Testing?
Check out our other blog posts and resources on API testing, automation, and quality engineering.
Read More Blog Posts